Company Settings Page
This screen centralises your organisation’s master data, financial parameters, localisation preferences and security controls - all in one place

Company Settings page upon your initial login
Add or update all information to ensure it’s accurate and complete
Click to maximise image
Company Identity
Your Company Identity settings ensure that every communication, document and report generated by Helm carries the correct organisational information
Set Your Company Name and Logo
Click the pencil icon adjacent to the existing name or logo placeholder to open the editor panel
Here you can:
Enter or update your official company name
Upload a high‑resolution logo image (recommended dimensions: 300 × 100 px)
Preview how your branding will appear on invoices, packing slips and email footers

Primary Contact
The Primary Contact details determine who receives all general system‑related notifications and enquiries
Name – the individual responsible for day‑to‑day system management
Telephone – the direct line for urgent operational alerts
Email Address – used for notifications such as system updates, user invitations and non‑financial alerts
Keeping this information accurate ensures that all core communications reach the right team member without delay
Billing Contact
Billing Contact settings control where all invoices, credit notes and financial statements are sent
Name – the person or department responsible for processing your invoices
Telephone – the finance team’s dedicated line for payment queries
Email Address – used by Helm to send automated billing notifications and PDF invoices
Correctly configuring this contact streamlines your accounts‑payable process and reduces the risk of missed or late payments
Company Address
Your registered Company Address appears on official documentation and is essential for compliance
Search – begin typing your address in the search field and select the correct entry from the dropdown
Manual Entry – if your address is not listed, click Add Manually and fill in each field (street, city, postcode, country)
Accurate address data populates invoice headers, shipping documentation and legal reports
Warning
If you see “This company does not have company address assigned” or “does not have financial details assigned,” click into those sections to add your physical address or banking details so that documents (invoices, packing slips, returns labels) can carry accurate company information
Financial Details
Financial Details underpin all of your billing and compliance activities within Helm
Complete the following fields to ensure full regulatory alignment:
Company Name – your legally registered trading or holding company name
Company Number – the official registration number issued by Companies House (or equivalent)
Tax ID – your domestic tax reference for VAT or sales tax purposes
IOSS Number – EU Import One‑Stop Shop identifier for streamlined VAT collection on low‑value imports
EORI Number – Economic Operators Registration and Identification code for customs clearance
Entering these details accurately ensures that invoices, customs documentation and financial exports adhere to statutory requirements and audit standards
By meticulously completing each section above, you establish a robust Company Identity within Helm - paving the way for consistent branding, seamless financial processing and regulatory compliance across your entire fulfilment operation

Item Cost Settings
Item Cost Type choose how you manage costs for items ordered from suppliers
Fixed Cost manually set and manage the item cost
It wont change unless you decide to change it yourself
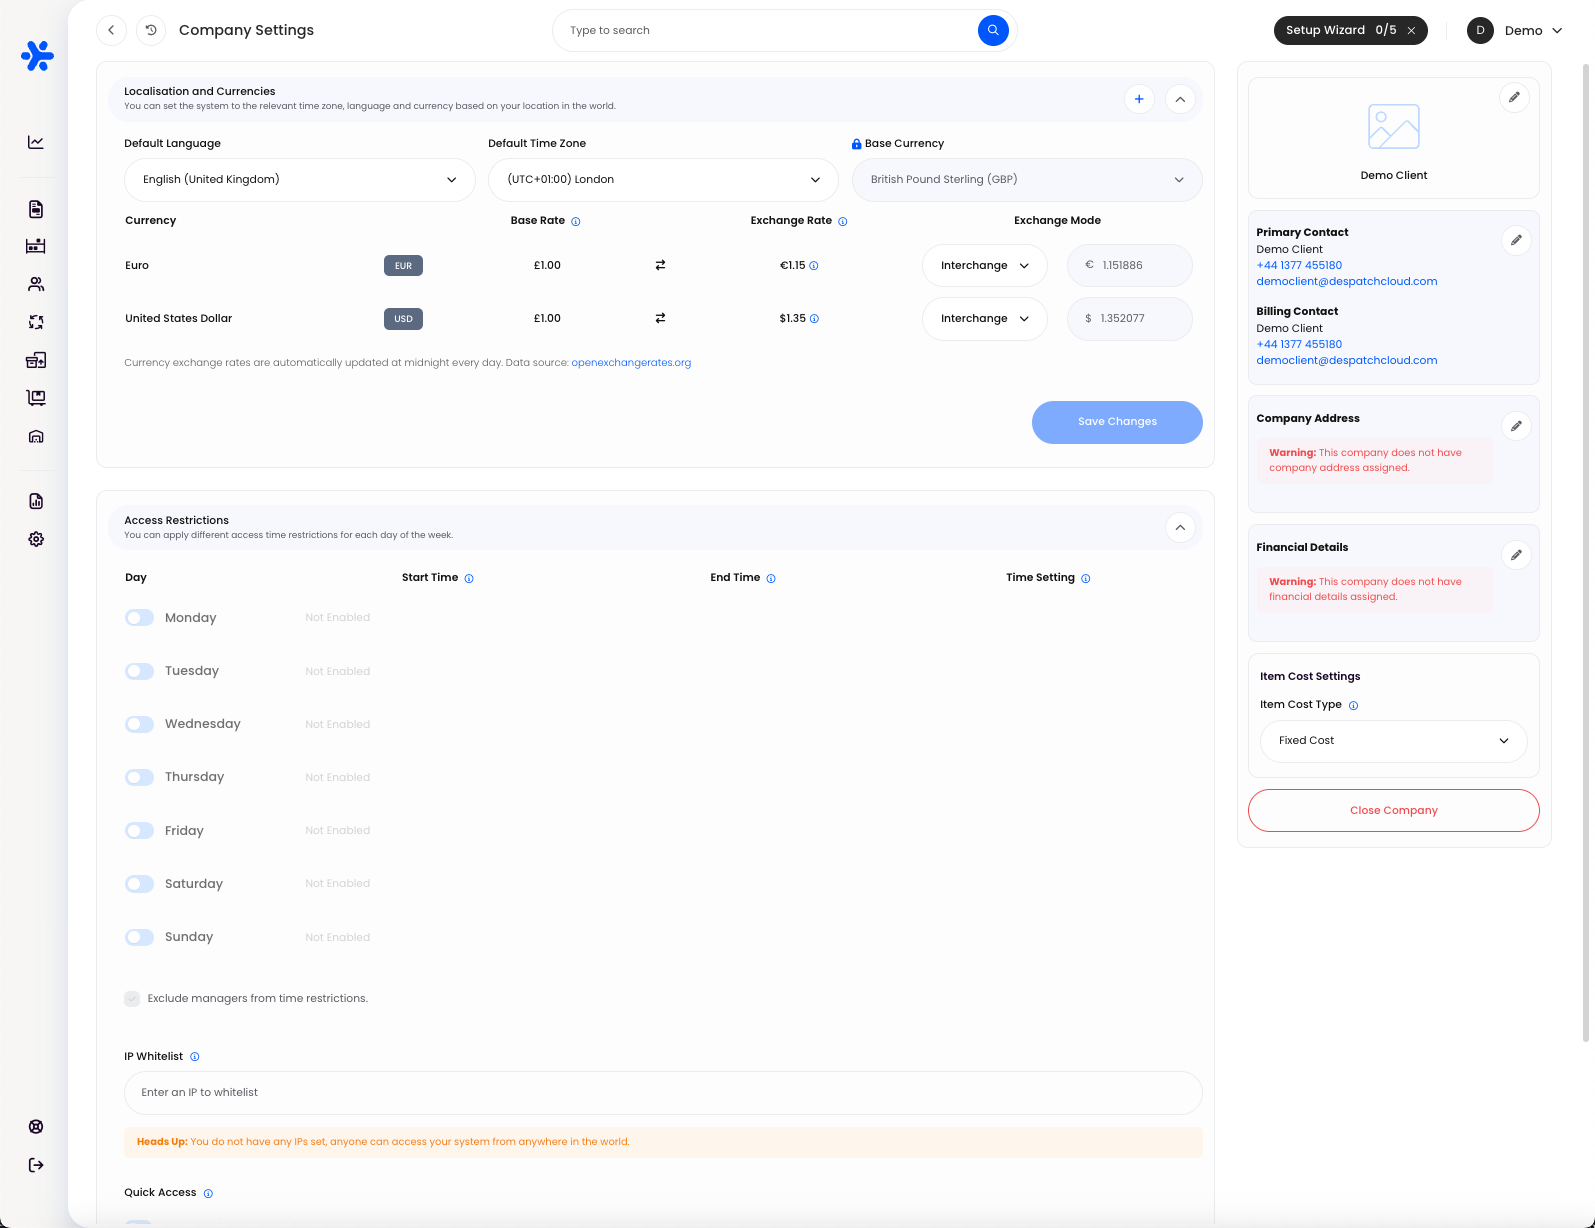
Localisation and Currencies
Configure the regional settings that govern how dates, times and monetary values display throughout Helm
Exchange Rates Table
Rates update automatically at midnight daily, sourced from openexchangerates.org
Use these values for multi‑currency sales, reporting or channel integrations that require live conversion
Access Restrictions
Enhance your security posture by defining precise windows during which users are permitted to log in to Helm - all under your complete control
Access Time designates the period during which logins are allowed
Restricted Time indicates that no logins are permitted
Click any row to customise the login window - whether narrowing access to standard business hours or permitting weekend operations
Attempts to authenticate outside of the defined window are automatically denied, safeguarding your system against unsanctioned access
Optionally exclude specific user roles (for example managers or administrators) from these restrictions to ensure critical personnel retain uninterrupted access
By tailoring these settings to your organisation’s operational rhythms, you maintain stringent control over who may enter Helm and when, reducing risk and reinforcing compliance with your security policies
IP Whitelist
Further bolster your system’s security by restricting access to only those network locations you explicitly trust
Enter Specific IP Addresses or Ranges
In the whitelist field, input individual IPv4 or IPv6 addresses, or CIDR ranges (e.g.
192.168.0.0/24or2001:db8::/32) to define precisely which networks are permitted to connect
Limit Access to Whitelisted IPs
Once you enable IP whitelisting, any login attempt originating from an IP address not on the list will be automatically blocked
This safeguard prevents unauthorised access even if credentials are compromised
Support for IPv4 and IPv6
Helm accepts both IPv4 and IPv6 formats, ensuring compatibility with modern and legacy network setups
Warning: No Entries Means Wide‑Open Access
If your whitelist is empty, a prominent warning will inform you that “anyone can access your system from anywhere in the world”
To eliminate this risk, add your corporate office IP, home‑office VPN, 3PL partner networks or any other trusted endpoints
Recommended Whitelist Workflow
Gather Approved IPs
Collect the external IP addresses of all environments that require system access: office routers, remote VPN endpoints, testing servers, etc
Add and Label
Enter each IP or subnet into the whitelist field and use descriptive labels (e.g. “HQ VPN 203.0.113.0/24”) to maintain clarity
Test Access
Verify that whitelisted devices can still log in as expected
Attempt a login from a non‑whitelisted network to confirm it is appropriately blocked
Maintain and Audit
Regularly review and update your whitelist when team members or infrastructure change
Remove stale entries to minimise your attack surface
By implementing IP whitelisting in tandem with strong user authentication policies, you can create a highly secure perimeter around your Helm WMS environment, ensuring that only known and trusted networks gain entry to your mission‑critical fulfilment platform
Quick Access
A reminder to assign Quick Access codes in Users
Enable Quick Access for each user for one‑tap entry via PIN