Getting Started with the Helm API
Create a Personal Access Token in Helm WMS, find your Company ID and send your first request, so your own systems can work with Helm automatically.
What You Can Do with the Helm API
The Helm API lets your other systems talk to Helm directly. Orders, stock, shipments and more can move between Helm and the software your business already runs on, such as your website, an accounting package or your own reports, without anyone keying them in by hand.
Example: you want orders from your own website to appear in Helm automatically. Your developer uses the Orders part of the API to send each new order to Helm as it is placed, so your team can pick and despatch it like any other order.
Each area of Helm has its own set of requests, for example:
Note: the Helm API Documentation lists every request, what to send and an example of what Helm sends back. It is also linked as Postman Docs at the bottom of the help centre. Use the Language setting at the top to show the examples in the programming language your developer works in.

Before You Start
Someone to build the integration. Using the API means writing code, so share this article with your developer or integration partner. You do not need to code to create a key or find your Company ID; this article walks you through both.
A Helm user with the right role. A key works as the person who created it, so it can only do what that person's role allows in Helm.
Full Mode for location-based requests. Picking, stock movements and other requests that rely on warehouse locations only work when your warehouse runs in Full Mode. See Understanding Warehousing Modes in Helm.
Creating a Personal Access Token
A Personal Access Token, shown in Helm as an API Key, is how Helm knows who is sending a request. Create a separate key for each system you connect, so you can manage each one on its own.
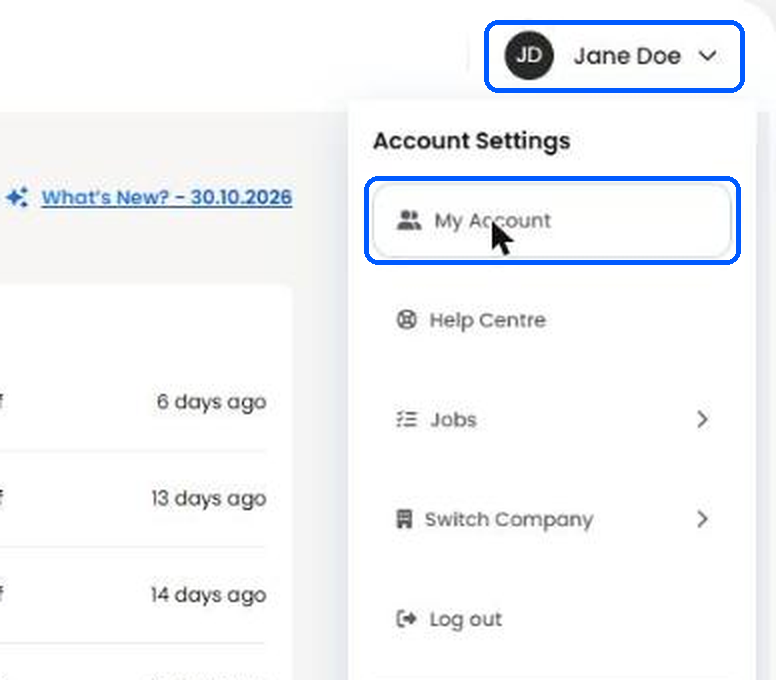
Click your name at the top right of Helm and choose My Account.
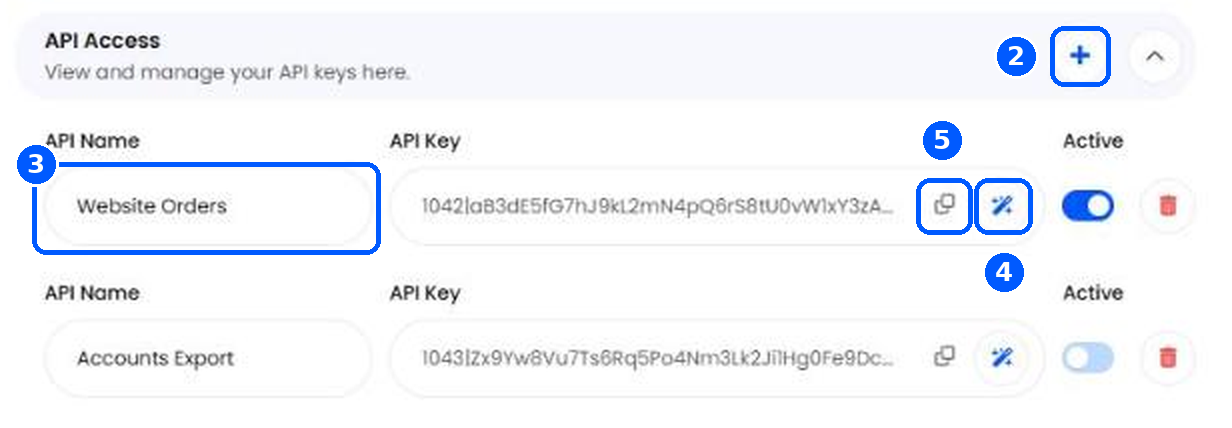
Scroll down to API Access and click the + icon. A new row appears.
In API Name, enter a name that says what the key is for, such as Website Orders.
Click the wand icon at the end of the API Key field. Helm generates the key straight away.
Click the copy icon next to the key and share it with your developer through a secure route, such as your password manager.
Warning: treat your API key like a password. Anyone who has it can reach your Helm data with your permissions, so never paste it into emails, support tickets, chat tools or screenshots.
Note: the key is saved as soon as it is generated, so you do not need to click Save Changes for it.
Finding Your Company ID
Every request names the Helm company it is for. Your Company ID is the number after /companies/ in your browser's address bar while you are signed in to Helm.
Example: if the address ends in /companies/4821/orders, your Company ID is 4821.
If you work across more than one company, each has its own Company ID. Choose Switch Company from the menu behind your name, then check the address bar again.
Sending Your First Request
Every request goes to the same address, followed by your Company ID and the area of Helm you want to work with:
https://app-api.helmwms.app/api/v2/companies/{Company ID}/...Your key goes in the Authorization header of every request, as a bearer token:
Authorization: Bearer YOUR_API_KEYTo check the key and Company ID are working before building anything else, your developer can send a ping request. A successful reply means Helm has recognised both:
curl https://app-api.helmwms.app/api/v2/companies/YOUR_COMPANY_ID/ping \
  -H "Authorization: Bearer YOUR_API_KEY" \
  -H "Accept: application/json"
From there, your developer can open the area they need in the Helm API Documentation, such as Orders or Inventory, to see exactly what each request needs.
Managing Your API Keys
Every key you have created is listed under API Access in My Account. Changes take effect straight away.
Active: switch a key off to pause it without deleting it. Requests sent with it are refused straight away until you switch it back on.
Copy icon: copies the key again whenever you need it.
Wand icon: generates a new key for that row, for example if a key may have been shared by mistake.
Bin icon: removes a key you no longer need.
Heads up: generating a new key replaces the old one, and the old key stops working straight away. Give the new key to your developer and update every system that uses it. The new key is always switched on, even if the old one was off, so reopen My Account and check Active if you want it paused.
Warning: a deleted key stops working straight away, and any system still using it can no longer connect to Helm. If you are not sure whether a key is in use, switch it off first and check nothing breaks.
Best Practices
One Key per Integration
Give each connected system its own key with a clear name, such as Website Orders or Accounts Export. If one needs pausing or replacing, the others carry on as normal.
Start with One Flow
Connect one flow first, such as new website orders, and check the results in Helm before adding more. A mapping problem is far easier to spot in one flow than in five.
Stay Within the Limits
Each request has its own limit on how often a key can call it each minute. If an integration goes over, Helm replies with Too Many Requests and says how many seconds to wait, so build in that pause rather than retrying straight away.
Tip: create integration keys from a Helm user whose role covers only what the integration needs. That way a key can never reach more of your data than it should.
FAQ
Is an API key the same as a Personal Access Token?
Is an API key the same as a Personal Access Token?
Yes. Helm shows it as an API key under API Access in My Account, and developers may call it a Personal Access Token or bearer token. They are the same thing.
Do I need to be a developer to use the API?
Do I need to be a developer to use the API?
Not to get started. Anyone can create a key and find the Company ID; building the connection itself needs someone comfortable writing code.
Why does a request come back as Unauthorized?
Why does a request come back as Unauthorized?
Helm did not recognise the key. Check it was copied in full, that it is still listed under API Access with Active switched on, and that the header reads Authorization: Bearer followed by the key.
Why does a request come back as Forbidden?
Why does a request come back as Forbidden?
The key's user does not have permission for that area of Helm, or the request needs Full Mode and the warehouse runs in Basic Mode. Check the user's role first, then the warehouse mode.
Why does a request come back as Too Many Requests?
Why does a request come back as Too Many Requests?
The integration has gone over the limit for that request. Wait the number of seconds Helm gives in its reply, then try again.
Where can I see everything the API can do?
Where can I see everything the API can do?
In the Helm API Documentation, which lists every request by area of Helm.
Need a hand with your integration? Contact Support and the team will help.
Was this helpful?
Still need help? Share an idea