Getting Started with Helm Fulfilment
Helm Fulfilment gives every client you fulfil for their own branded hub, and gives your team one place to run them all. This guide covers what to set up, in what order, to get your first client hub live.
What Helm Fulfilment Does
Helm Fulfilment turns Helm into a client portal for third-party logistics. Every client you fulfil for gets their own hub: a portal with your branding where their team can see orders, products, customers, suppliers and inbound stock, while your warehouse picks, packs and dispatches the orders in Helm WMS.
Your own team runs all of those hubs from one place, the Master Hub. It shows how every client is performing, holds the settings every hub shares, and opens any client's hub when you need to look inside.
Example: You fulfil for three eCommerce brands. Each brand's team logs in to its own hub, in your logo and colours, to follow its orders and stock. Your account manager watches all three from the Fulfilment Control Panel, sees that one brand's orders are slipping behind their dispatch target, and launches that hub to find out why before the client has to ask.

Key Terms

Before You Start
An activation code: Fulfilment is a paid product, switched on with the activation code you receive when you buy it. If you don't have one, contact the Helm support team.
You are an account admin: account settings and new hubs are managed by the people listed under Settings > Account Admins.
You can get a Helm WMS API token: connecting a hub to your warehouse needs the Helm WMS company ID and an API token, generated from the My Account menu in Helm.

Installing & Activating Fulfilment
This is done once for your Helm account.
In Helm, open the App Store from the sidebar.
Under All Apps, click Explore All Apps, then click Install on the Fulfilment card. You can also click the card first to read about the app, and click Install from there.
On the Install Fulfilment App screen, click Allow. This gives the app access to your Helm account and its data. Fulfilment now appears under My Apps.
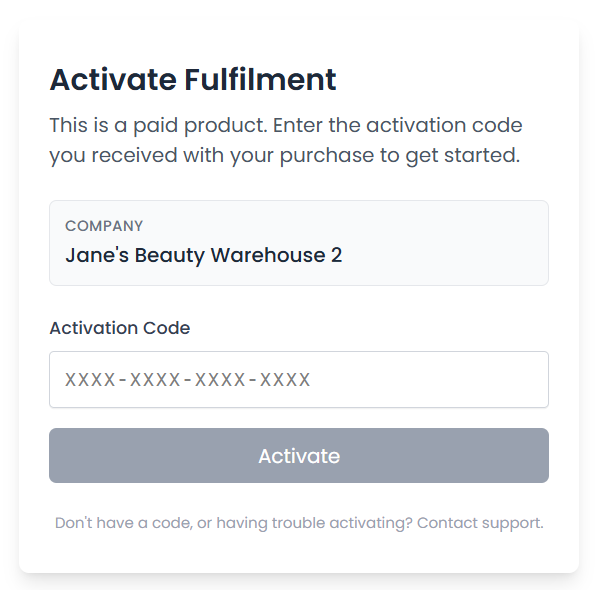
Under My Apps, click Fulfilment. The Activate Fulfilment screen opens, showing your company name.
Enter your Activation Code and click Activate.
Note: If you don't have an activation code, or it isn't accepted, contact the Helm support team.
Opening the Master Hub
Once Fulfilment is activated, this is how you open it every time:
In Helm, open the App Store from the sidebar.
Under My Apps, click Fulfilment.
The Master Hub opens in a new browser tab, on the Fulfilment Control Panel.
Note: If your browser blocks the new tab, Helm shows a message that the master hub did not open automatically. Click Open Master Hub to open it.
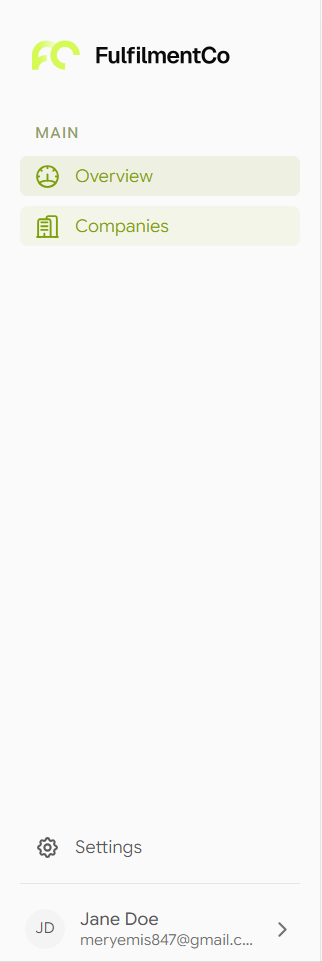
The Master Hub sidebar has Overview (the Fulfilment Control Panel) and Companies, with Settings at the bottom. Your profile menu, bottom left, holds My Profile, Dark Mode and Log Out. The account name at the top right opens Switch Account if you manage more than one account.

Setting Up Your Account
Work through these in order. Each step is something the next one uses, so following the order means nothing has to be gone back over later.
Account details and branding. In Settings > Account Info, add your name, logo and contact details. In Settings > Branding, set the title, colours, logo and favicon your clients will see. Branding applies to every hub automatically.
Warehouse connection. In Settings > Warehouse Connections, connect your Helm WMS company. Hubs reuse this connection, so the credentials are entered once.
SLA policies. In Settings > SLA Policies, create a policy group and add the dispatch targets you have agreed with clients. New hubs join the default group as soon as they are created.
Email delivery. In Settings > Email Delivery, choose whether emails go out from the platform address or from your own domain.
Create the first hub. Go to Companies and click New Company.
Link the hub to your warehouse. On the hub's page, click Add under Warehouse Connections & Couriers.
Give the client access. On the hub's page, click Manage under Hub Users and add the client's team.
Check it from the inside. Click Launch Hub to see the hub exactly as your client will.
Tip: Set up branding and SLA policies before you create any hubs. New hubs pick up both straight away, so every client starts with your look and is measured against your targets from day one.
Two settings are optional and can be added at any time: Hub Happiness, a short in-app survey for each hub's team, and Cost Centre Billing, which raises customer charges automatically.

Launching a Hub
Click Launch Hub on a client's card in the Fulfilment Control Panel, or at the top of the hub's page. The hub opens with a yellow banner saying you have launched into it as an admin, so it is always clear you are not one of the client's own users. Click Exit on the banner to return to the Master Hub.
Inside a hub, the sidebar has Overview, Orders, Products, Customers, Suppliers, Inbound Shipments, SLA, Reports, App Store and Settings. This is what your client's team works in day to day.
Note: If the hub has the Purchase Ordering module switched on, a Purchase Orders menu also appears above Inbound Shipments.

Best Practices
Agree a Naming Convention for Hubs
The hub name appears on the Control Panel, in the Companies list and inside the hub itself. Using the client's trading name consistently makes it quick to find the right hub once you have a lot of them.
Walk Through a Test Order Before Go-Live
Before handing a hub to a client, launch it and follow one order from creation to dispatch. It confirms the warehouse connection, addresses and SLA targets all behave the way you expect.
Keep Client Context on the Hub
Use Company Notes on the hub's page for anything your team should know about the client, such as special packing instructions or who to call. Everyone who opens the hub sees it.

FAQ
Is a hub the same as a company?
Is a hub the same as a company?
Yes. The Master Hub lists hubs under Companies, and a new hub is created with the Create Company wizard.
Do my clients see the Master Hub?
Do my clients see the Master Hub?
No. The Master Hub is for the account admins listed under Settings > Account Admins. Your client's team is added to their own hub through Hub Users.
Do I need to set up branding for each hub?
Do I need to set up branding for each hub?
No. Branding is set once in Settings > Branding and applies to every hub in the account.

Still stuck? Contact the Helm support team and we will help you get your first hub live.
Was this helpful?
Still need help? Share an idea