Managing a Hub
Each client hub in Helm Fulfilment has its own page in the Master Hub. Use it to check the client's figures, link the hub to your warehouse, and manage its settings, currencies, users and notes.
What the Hub Page Does
The hub page brings everything about one client together: how their orders and stock are doing, which warehouse fulfils them, and how their hub is set up. Open it by clicking the hub's name in Companies.
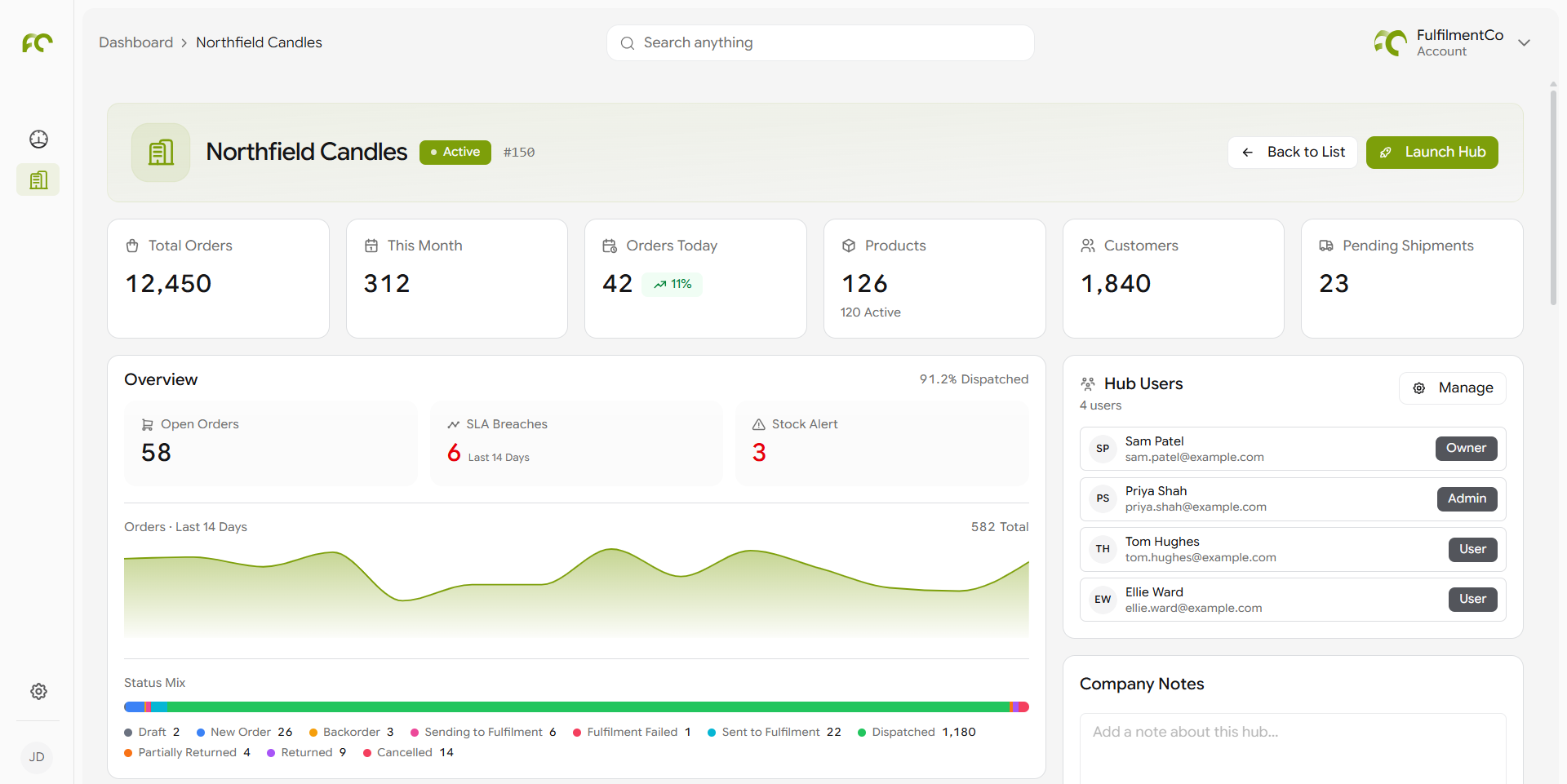
The header shows the hub's name, its status, its hub ID and two buttons: Back to List returns to Companies, and Launch Hub opens the hub as an admin.
Example: A client calls to say they have started selling in Turkey and want to add two people from their new office. From their hub page you add Turkish lira under Accepted Currencies, create the two users under Hub Users, and leave a note in Company Notes so the rest of your team knows about the change.

Hub Figures
The tiles under the header give the client's totals at a glance.
The Overview panel below shows the same health checks as the client's card on the Control Panel: Open Orders, SLA Breaches, Stock Alert, a chart of Orders · Last 14 Days and the Status Mix.

Linking the Hub to Your Warehouse
A hub needs a warehouse connection before its orders can be fulfilled and couriers used. The credentials are stored once at account level, in Settings > Warehouse Connections, and each hub picks the one it should use.
Under Warehouse Connections & Couriers, click Add, or Add First Connection if the hub has none yet.
Pick the warehouse connection that holds the credentials for this client's warehouse.
Confirm to link it. The connection then shows in this section and in the hub's Warehouse Connections column in Companies.
Note: If the list says there are no presets in this account yet, create a warehouse connection under Settings > Warehouse Connections first, then come back to the hub.

Hub Settings
The Settings panel has four tabs. Click Save Changes (or Save) on a tab before moving to the next.
Defaults
Tip: Switching Enable Purchase Orders off later only hides the menu. The client's purchase orders are kept, and come back if you switch it on again.
Company Details
The client's Legal Name, Phone, main contact (Contact First Name, Contact Last Name, Contact Email), and optional Company Number, VAT Number, IOSS and EORI.
Addresses
Each address has its own tab: Store is where the company operates from, Sender is the ship-from address that appears on shipping labels, and Return is where customers send returns. An address shows Not set until it is filled in, and Configured once saved. On Sender and Return, click Copy from Store to start from the store address.
Email Delivery
By default a hub uses Use Account Setting, so its emails go out the same way as the rest of your account. Choose Platform Default or Your Own Provider to give this hub its own delivery, then click Send Test Email to check it before you Save.

Accepted Currencies
The currencies this hub accepts, and how each one converts to its base currency.
Click Add Currency, search for the currency and switch it on. Add as many as you need, then click Done.
In the list, choose each currency's Mode: Interchange, Fixed Rate or Formula, as described in Creating & Managing Hubs. For Fixed Rate and Formula, enter the Value.
Click Save Changes in the Settings panel above to keep the new rates.
Heads up: A change to a currency's mode or value is only kept once you click Save Changes. If you leave the page first, the currency goes back to how it was.
Interchange rates update automatically at midnight every day from openexchangerates.org.

Adding Hub Users
Hub users are the client's own team: the people who log in to the hub to see their orders and stock.
Under Hub Users, click Manage. The Manage Users panel opens with Users and Invitations tabs.
Click New User and choose how to add them:
Add Existing: give someone who already exists in your account access to this hub, then click Link to Company.
Create New: enter Name, Email, Password and Confirm Password, then set Role, Status, Timezone and Language. Click Create User.
Send Invitation: email the person an invitation so they set up their own login.
Note: When creating a user, tick Mark email as verified to skip the verification email, so the user can sign in straight away.

Company Notes
Use Company Notes for anything your team should know about this client: special packing instructions, agreed cut-off times, who to call with a problem. Type the note and click Add Note. Notes are for your team's reference only.

FAQ
Why can't I change the base currency?
Why can't I change the base currency?
It is fixed when the hub is created, because every exchange rate for the hub converts from it. Add other currencies under Accepted Currencies instead.
What is the difference between Add Existing and Create New?
What is the difference between Add Existing and Create New?
Add Existing gives someone already in your account access to this hub. Create New sets up a brand new login for them.
Does a hub follow the account's email settings?
Does a hub follow the account's email settings?
Yes, unless you change it. The hub's Email Delivery tab is set to Use Account Setting by default.
Need help with a hub's setup? Contact the Helm support team.
Was this helpful?
Still need help? Share an idea