Location Categories
Group your stock locations by type in Helm WMS, such as Large Shelf and Small Shelf, assign them one at a time or in bulk, and use them to charge different rates per location type.
What Location Categories Do
Location Categories let you group your stock locations by a type that means something to your business, such as Large Shelf, Small Shelf or Pallet Bay. Each warehouse keeps its own list of categories, and you pick from that list rather than typing a name each time, so the same type never ends up spelt three different ways.
Categories can sit under a parent, so related types stay together. A Shelf category could hold Large Shelf and Small Shelf, and the Location List shows both, for example Shelf > Large Shelf.
Example: a fulfilment warehouse charges its clients more for stock on large shelves than on small ones. It creates a Shelf category with Large Shelf and Small Shelf under it, assigns each shelf location to the right one, and its billing in Cost Centre charges a different rate for each.
Note: Location Category is separate from Location Type. Location Type controls how Helm treats a location when picking and moving stock, so keep it as it is and use a category for your own grouping.

Before You Start
Full Mode. Stock locations, and so Location Categories, are part of Full Mode. See Understanding Warehousing Modes in Helm.
Your locations. Categories are assigned to existing locations. If you are setting up a new warehouse, create your locations first; see Mastering Stock Locations in Helm.
One category per location. A location belongs to one category at a time. Choosing a new category for a location replaces the one it had.
A list worked out in advance. Decide which categories you need before importing, because an import can only use categories that already exist.

Creating Categories
Categories are managed from the Location Category field on any location, so you can set up your list the first time you need it.
Go to Settings > Company Settings > Warehouse and click Go To Location List.
Click a location to open Edit Location, or click Create Location, then open Advanced.
Click the pencil next to Location Category. The Categories window opens.
If you have no categories yet, click Create Category. Otherwise, click the pencil at the top of the window to edit your list.
Enter a Category Name of up to 60 characters and, if you like, a Description. Click + to add more rows, then click Save Changes.
Adding Subcategories
In the Categories window, click the arrow next to the parent category, such as Shelf.
In Edit Subcategories, enter a Subcategory Name for each type, such as Large Shelf and Small Shelf. Click + to add more rows.
Click Save Changes.
Helm shows a subcategory with its parent first, for example Shelf > Large Shelf.

Assigning Categories to Locations
One Location at a Time
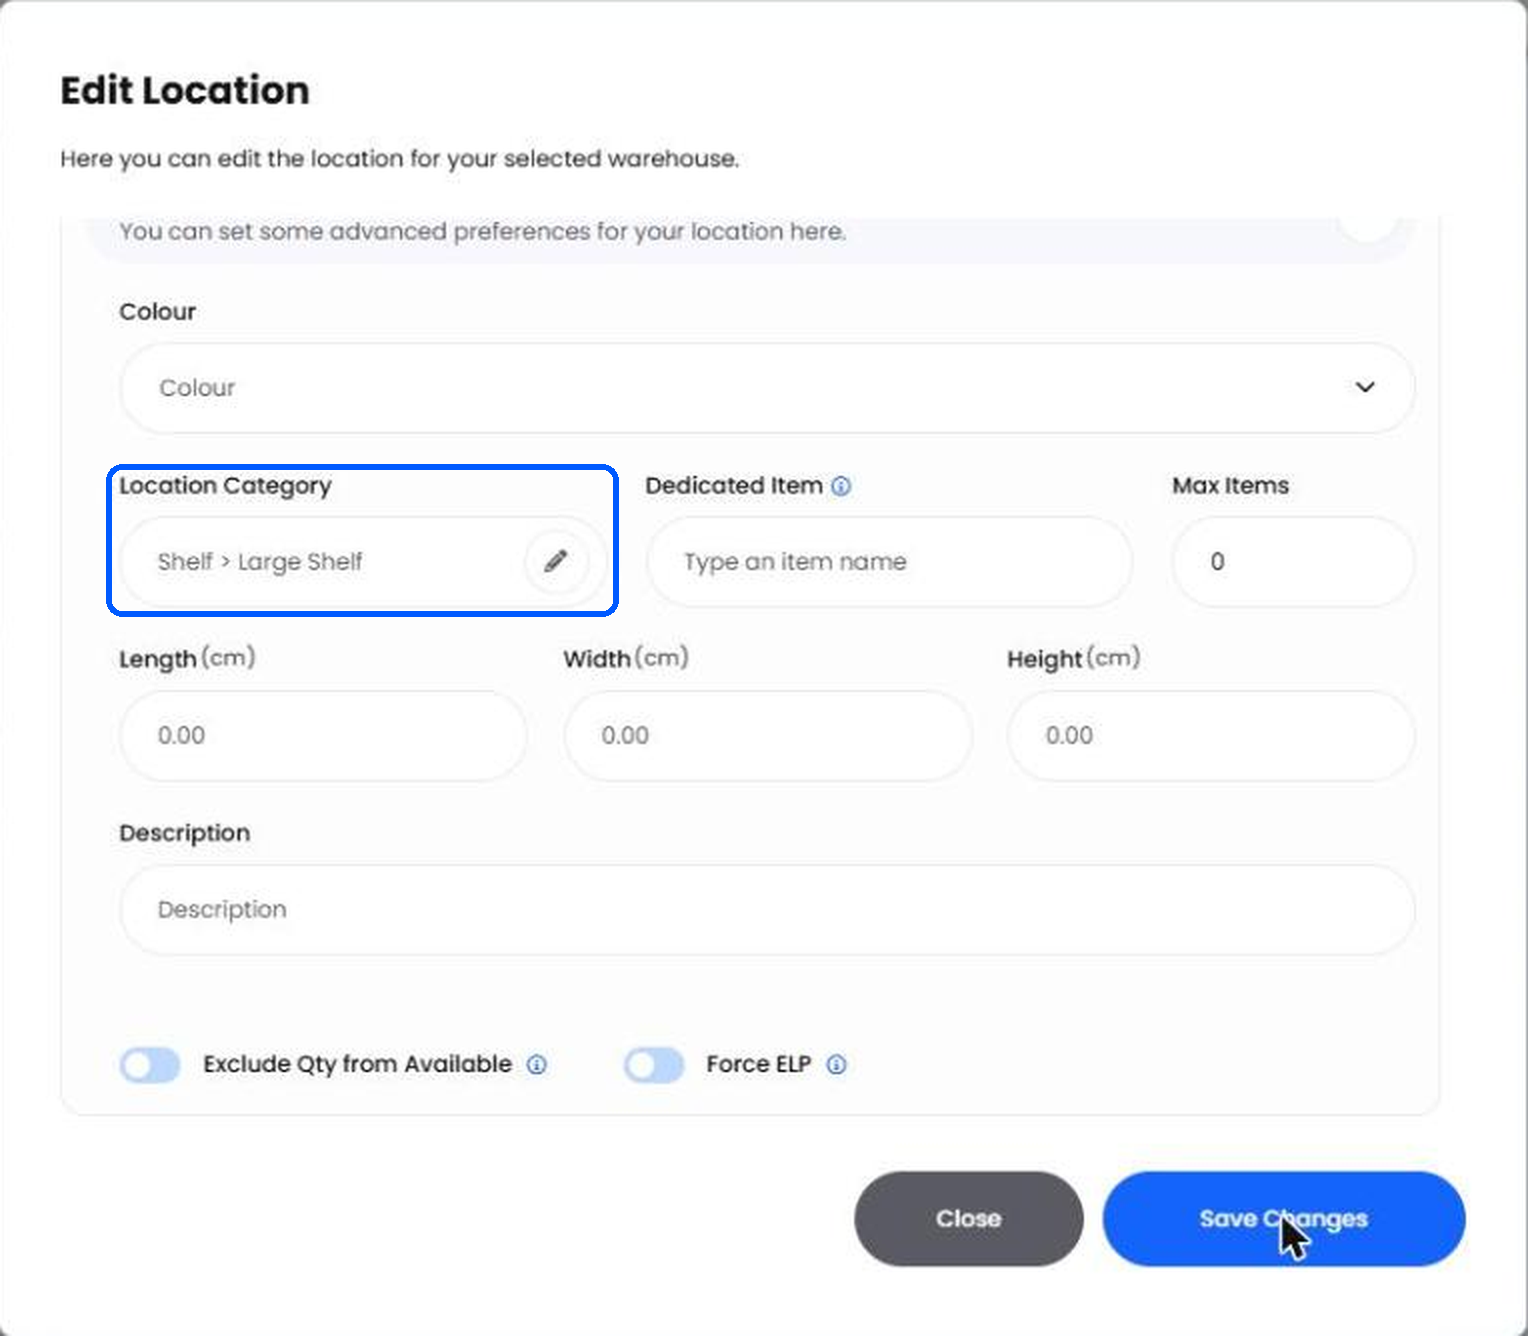
In the Location List, click the location and open Advanced.
Click the pencil next to Location Category.
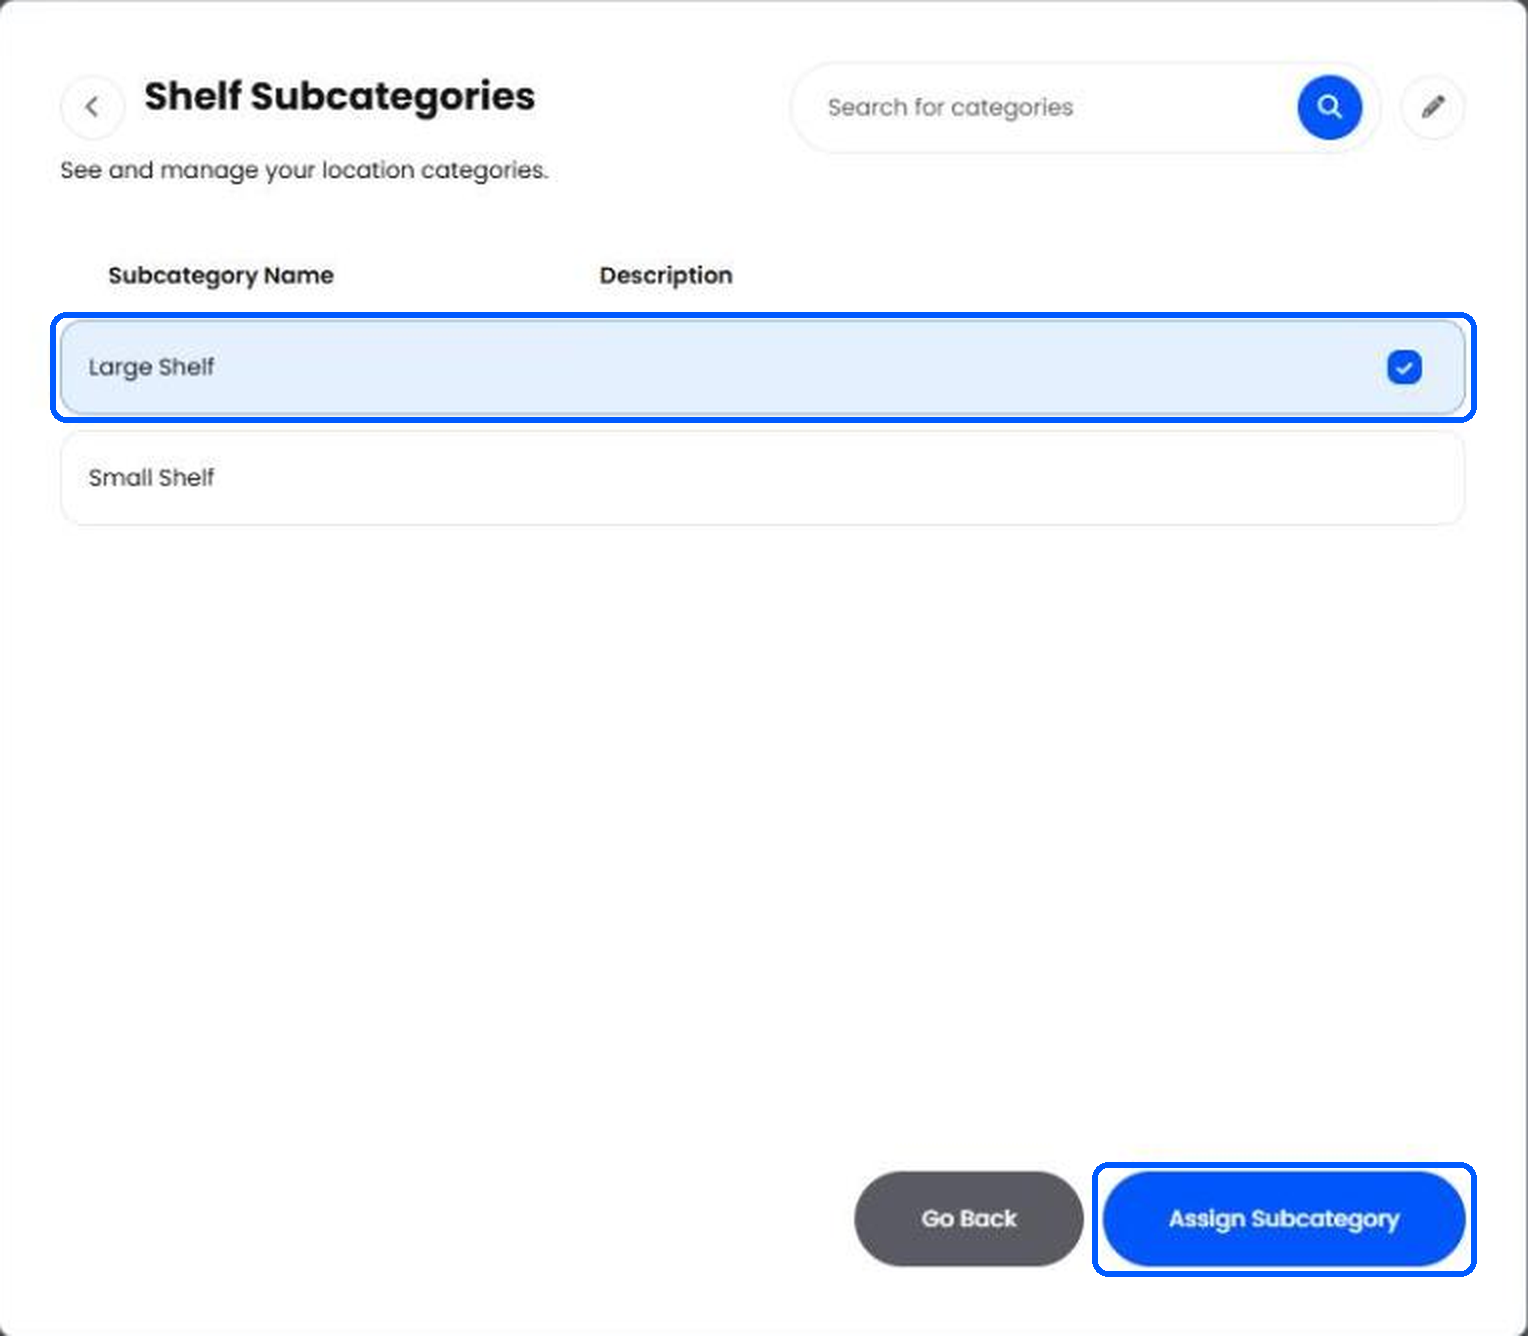
Tick the category and click Assign Category. For a subcategory, click the arrow next to its parent first, tick the subcategory and click Assign Subcategory.
Back in Edit Location, click Save Changes.
Several Locations at Once
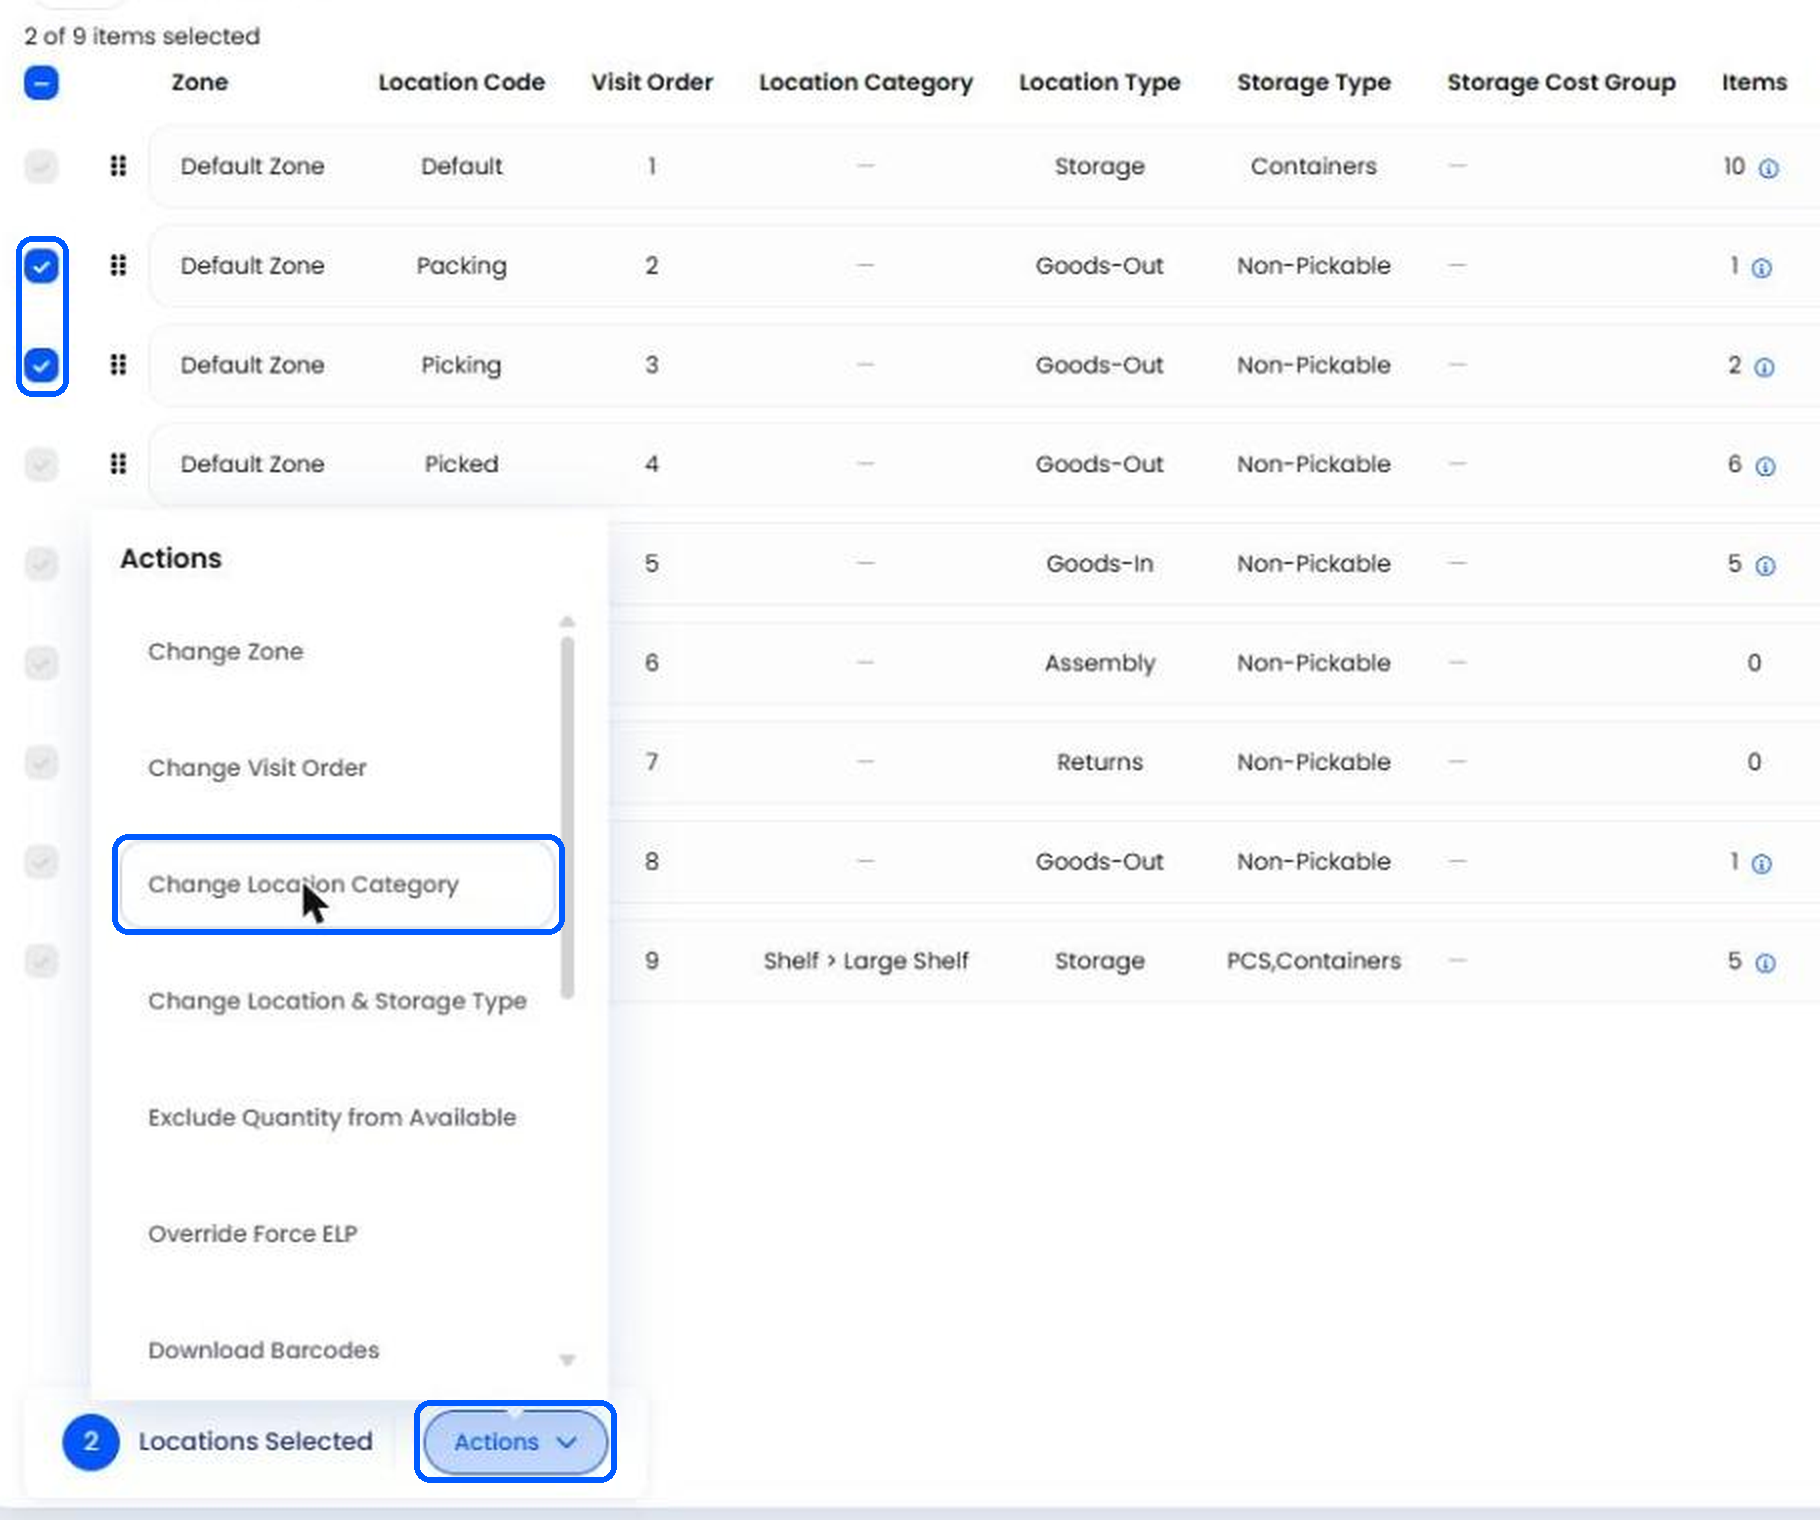
In the Location List, tick the locations you want to change. Use Filters to narrow the list first, for example by zone or location type.
Click Actions at the bottom of the page and choose Change Location Category.
Tick the category or subcategory and click Assign Category or Assign Subcategory.
Note: Helm queues the change and lets you know when it has finished, so a large selection can take a moment. Only the locations you ticked change, and if you picked the wrong category, the notification lets you cancel straight away.
The Location Category column in the Location List then shows each location's category, such as Shelf > Small Shelf.

Importing & Exporting Categories
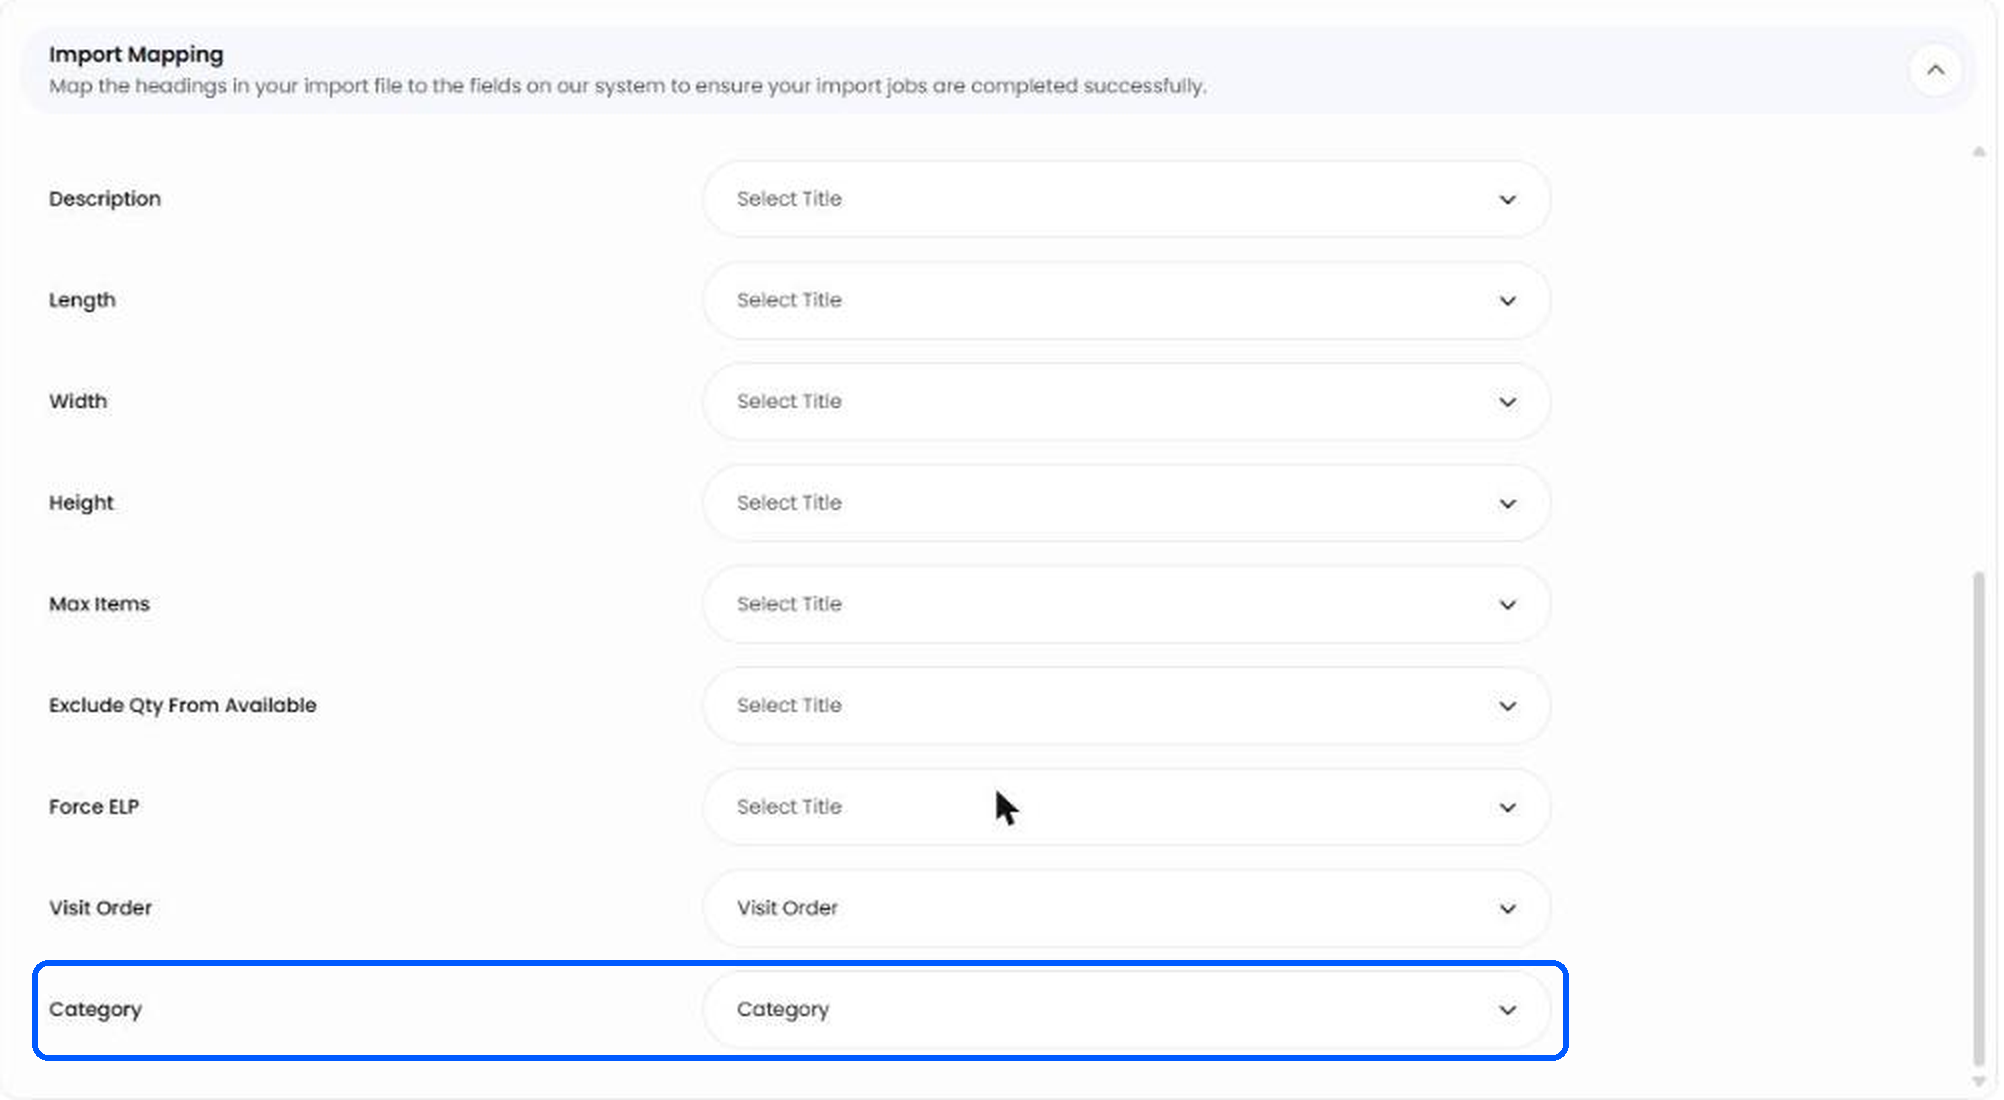
For a whole warehouse, importing is quicker than assigning categories by hand. The Location import has an optional Category field, which works for new locations and for locations you already have. Use the category's own name, such as Large Shelf, without its parent.
Heads up: the import does not create categories. Create every category you plan to use first, then import.
Updating Categories on Existing Locations
The easiest way is to start from an export, because the import also needs each location's Storage Type and Location Type, and the export already has them.
In the Location List, open the menu behind your name at the top right and choose Export List. Give the export a name, choose the format and click Export. Helm lets you know when the file is ready to download.
In the file, change the Category column, which is the last column, and save it.
Go to Settings > Company Settings > Import, choose Location as the Import type, add your file and click Continue.
In Import Mapping, check that Category is matched to your column. Helm matches it automatically when the heading is Category. Click Confirm.
Check the result in the Jobs Queue. If any rows failed, See Errors lists each one with its reason.

Charging by Location Category
If you bill your clients through Cost Centre, it can read how many locations you have in each category and charge a different rate for each, for example one rate for Large Shelf and another for Small Shelf. The rates themselves are set in Cost Centre, not in Helm; in Helm you only decide which category each location belongs to.
This is a different job from Storage Cost Groups, and the two are easy to mix up:
Note: the two are separate settings, so a location can have both a category and a Storage Cost Group. To set up Storage Cost Groups, see Cost Dashboard.

Using Categories Through the API
Your developer can read categories and category counts through the Helm API. Both requests work in Full Mode only; a warehouse in Basic Mode gets a Forbidden reply.
Each row in the counts reply has these fields:
Every category in the warehouse gets a row, including ones with a qty of 0, and locations without a category come back together in one row with category_id null. For the full details, see the Helm API Documentation, and to get set up, see Getting Started with the Helm API.

Best Practices
Name Categories the Way You Charge
If the categories are for billing, use the same names as your rates in Cost Centre, such as Large Shelf and Small Shelf. Anyone checking a bill can then match each line to the locations behind it.
Use a Parent for Each Family
Put related types under one parent, such as Shelf or Pallet. The Location List stays easy to read, and new types have an obvious home.
Review After a Layout Change
When shelving is moved or replaced, export the Location List and check the Category column, so locations are never billed at the rate of the shelving they used to have.
Tip: before a big import, try a file of five or six rows first and check them in the Location List. A mismatched name is far easier to spot in a few rows than in a few thousand.

FAQ
Can a location be in more than one category?
Can a location be in more than one category?
No. A location is in one category at a time, and choosing a new one replaces the old one. For other groupings, use the location's zone, location type, colour or storage type.
Does the import create categories I have not set up yet?
Does the import create categories I have not set up yet?
No. A name that does not match an existing category fails that row. Create the category first, then import again.
Why did a row fail with "The selected Category is invalid."?
Why did a row fail with "The selected Category is invalid."?
The name in the Category cell does not match a category in that warehouse, often because of a typo or because the category was deleted. Fix the name or create the category, then re-import the row.
Will an empty Category cell remove a location's category?
Will an empty Category cell remove a location's category?
No. An empty cell leaves the location's category exactly as it is.
What happens to locations when I delete a category?
What happens to locations when I delete a category?
They are left without a category. Assign them a new one so they are charged correctly.
Is a Location Category the same as a Storage Cost Group?
Is a Location Category the same as a Storage Cost Group?
No. A Storage Cost Group sets a daily cost in Helm for the Cost Dashboard; a category groups locations so Cost Centre can charge your clients. See Charging by Location Category above.
Still stuck? Contact Support and the team will help.
Was this helpful?
Still need help? Share an idea