Creating & Managing Hubs
Every client you fulfil for gets their own hub in Helm Fulfilment. This guide walks through the three-step Create Company wizard and how to manage your hubs from the Companies list.
What a Hub Is
A hub is one client's own portal. It sits under your account, so it shares your branding and starts in your default SLA policy group, but it has its own users, addresses, currencies and warehouse connection. In the Master Hub, hubs are created and listed under Companies.
Example: You sign a new client, Northfield Candles, who sells in the UK and Ireland. You create a hub called Northfield Candles with GBP as its base currency, accept euros at the live rate, add their warehouse-facing contact, and set the store address. Once it is linked to your Helm WMS warehouse, the client's team can log in and start sending orders.

Before You Start
Account admin access: only account admins can create hubs.
The client's base currency: decide this before you start, because it is set once when the hub is created and cannot be changed afterwards.
Company and contact details: the client's legal name, phone number, and the first name, last name and email of their main contact. Company number, VAT number, IOSS and EORI are optional.
A store address: the address the client operates from. Sender and return addresses can be added now or later.

The Companies List
Click Companies in the Master Hub sidebar to see every hub operating under your account, with the total at the top. Use Search companies... to find one by name, Columns to choose which columns show, and the refresh button to reload the list. The Company and Created columns can be sorted.
Tip: A hub with no recent Last Login Date may mean the client's team has not been set up or is struggling to get in. It is worth a quick check before their first busy day.

How to Create a Hub
In Companies, click New Company. The Create Company wizard opens with three steps: General, Company Details and Addresses.
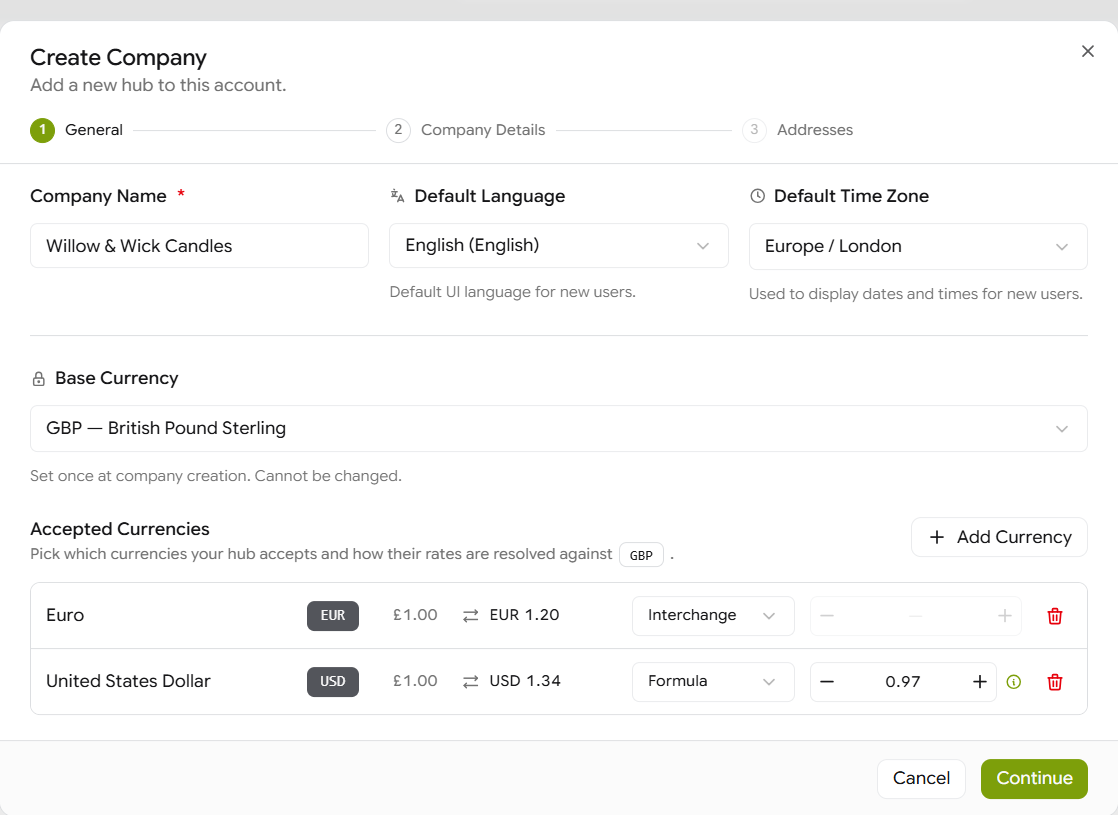
On General, fill in:
Company Name: the name shown on the Control Panel, in the Companies list and inside the hub.
Default Language: the language new users of the hub start with.
Default Time Zone: used to show dates and times to new users.
Base Currency: the currency every exchange rate for this hub converts from.
Warning: Base Currency is set once and cannot be changed after the hub is created. Check it with the client before you continue.
Under Accepted Currencies, add any other currencies the client trades in:
Click Add Currency, search for the currency and select it.
Choose how its rate is set: Interchange, Fixed Rate or Formula (see the table below). For Fixed Rate and Formula, enter the value next to it.
To remove a currency, click the bin icon on its row.
Click Continue.
On Company Details, fill in Legal Name, Phone, Contact First Name, Contact Last Name and Contact Email. Add Company Number, VAT Number, IOSS and EORI if the client has them. Click Continue.
On Addresses, fill in the Store tab: Address Line 1, City, Postcode and Country are required. Add a company name, extra address lines, county, VAT number and EORI if needed.
If the client sends from or takes returns at a different address, fill in the Sender and Return tabs in the same way.
Click Create. The new hub appears in the Companies list and joins your default SLA policy group straight away.
Next, open the hub's page to link it to your warehouse and add the client's users. See Managing a Hub.

Currency Rate Modes
Each accepted currency is shown as its rate against the base currency, for example £1.00 = EUR 1.20.

Editing & Deleting a Hub
To change a hub's details, click the actions menu on its row in the Companies list and choose Edit, or open the hub and use its Settings panel. Everything except the base currency can be changed.
Heads up: Only delete a hub you no longer fulfil for. If a client is pausing, set the hub's Status on its page instead, so its history stays in place.

Best Practices
Set Up Account Defaults First
Create your SLA policy group and branding before adding hubs. Each new hub picks them up the moment it is created.
Use the Client's Trading Name
Name each hub after the brand the client trades as. It is the name your team searches for and the one the client's staff recognise when they log in.
Complete All Three Addresses Before Go-Live
If the client's sender or return address differs from their store address, add it before the first orders arrive, so nothing goes out with the wrong details.

FAQ
Can I change a hub's base currency later?
Can I change a hub's base currency later?
No. The base currency is fixed when the hub is created. If it is wrong, create a new hub with the right currency before the client starts trading.
Do I have to fill in the Sender and Return addresses?
Do I have to fill in the Sender and Return addresses?
Not to create the hub; only the Store address is required. You can add the others later on the hub's page under Settings > Addresses.
How often do Interchange rates update?
How often do Interchange rates update?
Every day at midnight, from openexchangerates.org.
Still stuck setting up a hub? Contact the Helm support team.
Was this helpful?
Still need help? Share an idea