Account Settings
Account settings in Helm Fulfilment are set once and shared by every client hub: your details and branding, who can manage the account, the warehouse connection, email delivery and Cost Centre billing.
Where to Find Account Settings
In the Master Hub, click Settings at the bottom of the sidebar. The settings menu lists Account Info, Branding, Account Admins, Warehouse Connections, SLA Policies, Hub Happiness, Email Delivery and Cost Centre Billing. Click Back to Dashboard to return to the Control Panel.
Everything here applies across the whole account, so it is set once rather than for each client. SLA Policies and Hub Happiness have their own articles.
Example: Before onboarding your first client you upload your logo, set your brand colour, connect your Helm WMS company and switch emails to send from your own domain. Every hub you create afterwards opens in your branding, can be linked to your warehouse in two clicks, and sends emails your clients recognise.

Account Info
The basic identity of your account. Add a Logo (PNG, JPG or SVG up to 500 KB), shown in the header and the account switcher, then your Name, Contact Email and Contact Phone. Click Save Changes.

Branding
Branding sets how every hub looks to your clients. It applies to all hubs automatically, with no setup needed for each one. The Live Preview on the right shows your unsaved changes on a sample hub page, in Light or Dark mode.
Note: On Colours and Logo & Favicon, switch to Dark to set a separate version for dark mode. Leave it empty to reuse the light one.
Heads up: Reset to Default replaces the tab's settings with the Helm Fulfilment defaults.

Account Admins
The people who can manage this account in the Master Hub. The list shows each admin's name, email and when they joined. Click Invite to add someone, and use Columns to choose what the list shows.
Tip: Account admins are your own team. Give clients access through Hub Users on their hub page instead, so they only see their own hub.

Warehouse Connections
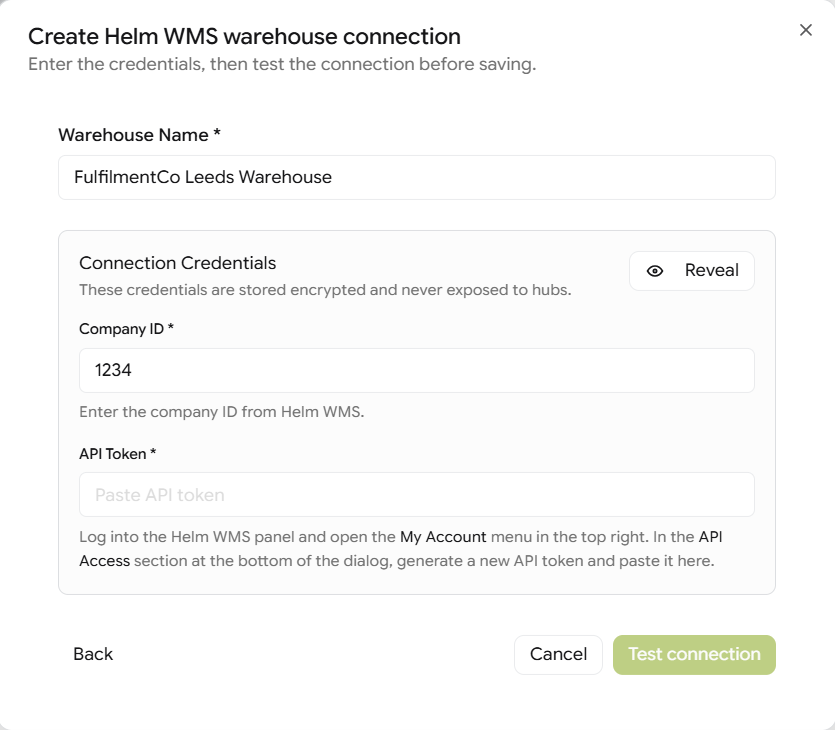
A warehouse connection holds the credentials for the warehouse system that fulfils your hubs' orders. It is created once here, and each hub then links to it from its own page. The credentials are stored encrypted and are never shown to hubs.
Click New Warehouse Connection.
Pick the warehouse system: Helm WMS.
Enter a Warehouse Name your team will recognise when linking hubs.
Enter the Company ID of your Helm WMS company.
Get an API token from Helm: open the My Account menu at the top right of Helm, scroll to API Access at the bottom of the dialog, and generate a new token. Paste it into API Token.
Click Test connection, then save once the test succeeds.

Email Delivery
Choose how your account's emails are delivered: notifications, purchase orders, invitations, SLA digests and reports. Hubs follow this setting unless they have their own.
Under Delivery Method, choose:
Platform Default: emails come from noreply@helmwms.app and are always accepted. You choose the name they show.
Your Own Provider: emails come from your own domain, through SMTP, Amazon SES or Mailgun.
Under Sender Identity, set the From Name and, if you want replies to go somewhere else, a Reply-To address. Recipients will see shows how the sender will appear in an inbox.
Click Send Test Email, then Save.
The Hubs table underneath shows what each hub actually sends with, and the health of its sender. Open a hub to give it its own delivery.

Cost Centre Billing
Connect your account to Cost Centre to raise customer charges automatically. The page shows Disabled until billing is switched on, and Open in Control Center takes you to Cost Centre itself. Setup has three steps.
Connect to Cost Centre: enter the account's API Key and click Test Connection. The remaining settings unlock once the test succeeds.
Configure Billing: set the account-wide defaults used when raising charges. Each linked warehouse connection can override them.
Activate Billing: click Save & Activate Billing. Customer links become available once billing is active.
Note: Once a key is saved, leave API Key blank to keep it. A new key is verified before it is saved.

FAQ
Do I need to set branding for each hub?
Do I need to set branding for each hub?
No. Branding applies to every hub in the account automatically.
Can a hub send emails differently from the rest of the account?
Can a hub send emails differently from the rest of the account?
Yes. Open the hub's page and choose a different method on its Email Delivery tab.
Where do I get the Helm WMS API token?
Where do I get the Helm WMS API token?
In Helm, open the My Account menu at the top right and generate a token in the API Access section at the bottom.
Need help with your account settings? Contact the Helm support team.
Was this helpful?
Still need help? Share an idea